It's been a busy day here. I began by cooking my first batch of grits, moved on to apple fritters and will finish with a dish for tonight's potluck supper (swim team). I took a brief nap in the middle of it all... after sampling the apple fritters.
Grits have the texture of coarse sand before they are cooked. They are simple to cook. Most grits fans tout the excellence of old-fashioned stone ground grits over the instant, quick variety. The bag in my freezer was the instant, quick variety. But not from Quaker, from a mill in Oklahoma. So, I don't know about that, mine turned out pretty good!
If you are sure to slowly whisk the grits into the boiling water you won't have lumpy grits.
When my grits were finished I poured them into a buttered loaf pan, reserving a bowl for myself. To this I added chopped ham and shredded cheddar cheese, mixing them thoroughly with the grits. Then, I covered them and placed them in the fridge to cool for several hours, to firmly set.
To my bowl I added butter, brown sugar, a drizzle of molasses and a handful of leftover chopped ham. It was delicious. As I enjoyed this interesting, somewhat nutty texture with a hint of corn flavor from my bowl, I pondered the origins of such dishes.
Proverbs, Biblical scriptures, Buddha and the Tao all suggest that the gleanings from the field be left for the workers. That's exactly what grits are; the hard bits of corn left after grinding cornmeal. After boiling up a big pot of stone ground grits, the cook would take leftovers and make something else rather than throw them out. Grits don't re-heat well for hot cereal. From that frugal mindset came many different recipes for grits. Including the fried grits I will prepare.
Fried Grits
Prepare grits according to directions
Pour into buttered loaf pan
Add 1 cup chopped ham and 1/2 cup shredded cheddar cheese
Mix well
Cover and refrigerate at least 6 hours
Slice "grit loaf" into 1/2 inch slices.
Dip first in 2 eggs beaten, then dredge in flour (approx 1 cup)
Pan fry or deep fry until golden brown, turning to cook both sides evenly
Fried grits can be served for breakfast, brunch, snack or side dish.
Fried grits update: I made the fried grits for breakfast the following morning and wow, they were fantastic! I will chop my ham a little more fine in the future and maybe add a bit more cheese. These were very filling. A "stick to your ribs" kind of breakfast. The fried rectangles are handy to grab and eat on the run as well.
This afternoon I decided to try another apple fritter recipe. So far, this one is our favorite, but I have a couple more to try. They are all very quick and simple. I'm able to have a fresh batch fried up in 30 min or less.
Apple Fritters
2 cups all-purpose flour
1/4 cup white sugar
1 tablespoon baking powder
1/2 teaspoon ground nutmeg
1/2 teaspoon ground cinnamon
1 teaspoon salt
2 eggs
1 1/4 cup milk
2 tablespoons oil
4 large apples, peeled and cored
1/2 cup confectioners' sugar for dusting
In a medium bowl, mix together flour, sugar, baking powder, nutmeg and salt. In a separate bowl, beat together eggs and milk. Stir milk mixture into flour mixture until smooth.
Heat oil to 375 degrees F (190 degrees C) in a deep fryer or heavy bottomed deep pot or skillet.
Slice apples into 1/2 inch rings. Dip apple slices in batter and fry, a few at a time, turning once, until golden. Drain on paper towels and dust with confectioners' sugar.
The recipe says to dip the apples, I found the batter a little thick for that. I had to dunk them pretty good and use a spoon to help coat them evenly. I don't have enough experience with it to know if the batter should be thinner. But, I do know they were very, very good. The recipe above is modified somewhat from a recipe I found online that was even a bit thicker. I refrigerated the batter to make some more fresh fritters later. I'm not sure how it will do, but I thought it worth a try. The fritters are not so good cold.
Apple Fritter Update: I used the batter the following afternoon without any problem. In fact, the spices had infused into the batter and it tasted even better. With the last bit of batter in the bowl, I chopped up my remaining apple and stirred it in. The result was fantastic! I think this is how I'll make them in the future... small, hushpuppy sized apple fritters.
The swim team is having a potluck supper tonight. I told you potlucks were popular in my community! It's the last get together before their district finals meet and the top swimmers are selected to swim representing the team at the state meet. I altered the sign up sheet a bit. Because these athletes are still in training and the meet is tomorrow, we needed very few sweets and mostly healthy proteins and carbs. For some reason everyone wants to bring a dessert to a potluck dinner. So, I placed necessary items in slots on the sign up sheet (paper plates, napkins, etc) and designated the number of main dishes, side dishes and desserts. Then, the kids just had to sign up by an item. They didn't even have to get specific and nail mom to preparing a certain item. This went over very well.
My family signed up to bring a main dish. So, tonight it's Chicken Enchilada Casserole. I love this recipe. It's one I make when I make the crockpot chicken and freeze to bake later. You follow the recipe as below, but you freeze it instead of putting it in the oven. Then, when you're ready for it, you just pop it in the oven and it's ready in about 30 - 40 minutes.
Chicken Enchilada Casserole
3-4 chicken breasts (or 6 Halves) (approx 4 cups shredded or chopped chicken)
1 (10 ounce) can cream of mushroom soup
1 (10 ounce) can cream of chicken soup
1 (8 ounce) can diced green chilies (hot or mild, or a small can of each)
1 (10 ounce) package cheddar cheese, grated
1 small onion, diced
1 tablespoon garlic powder
1 teaspoon salt
1/2 teaspoon ground cumin
12 corn tortillas
16 ounces sour cream
Place Chicken in large saucepan and cover with water. Sprinkle in ground cumin,add garlic powder and salt. Boil about 20 minutes and shred from bones. Save broth.
Mix soups, sour cream & chiles in large pan. Add only enough broth to slightly thin.
Re-season as needed. Simmer on low 15 minutes. Add chicken and diced onion.
In large (9x13) casserole dish, arrange 6 Tortillas flat across bottom, spoon in 1/2 the sauce, sprinkle 1/2 the cheese. Repeat- Tortillas, sauce and cheese. Bake in 350 degree oven for 20 minutes. I use two smaller Pyrex covered casserole dishes when I freeze it, because this makes more than enough for our family.
This very filling entree goes a long way to feed a crowd!
Showing posts with label frugal. Show all posts
Showing posts with label frugal. Show all posts
Tuesday, February 12, 2008


True Grits
I was digging around in my freezer, seeing what I had on hand and how old it might be (it's time to use up some of the things I've had in there a while) and I discovered a bag of grits. I don't recall purchasing grits. I don't even really care for grits as a breakfast food. And, while they are a southern soul food staple... they weren't in the house of my youth. They don't seem quite so popular west of the Mississippi in the part of the south I call home. So, I really don't know what to do with grits. I can only imagine they came to my freezer as a gift from someone well-meaning. Or, my husband picked them up when I wasn't looking (I think he might actually like them for breakfast!). Anyway, I don't intend to waste them.
So, I'm searching around the internet for grits recipes and I'm finding a lot of them. Apparently, baked cheese grits are a popular dish. Grits combined with cornmeal make spoon bread. There are recipes for grits biscuits and bread. I've also found a few grit casseroles that look interesting. I think I'm most intrigued by the fried grits recipe I found. I'll certainly give the shrimp and grits recipe a try (I feel a Bubba Gump moment).
I'm sure that after experimenting a bit, I'll come up with a few grits recipes to add to my family's menu. I'm not exactly sure why I've never ventured into grits territory before, but it certainly is a frugal food. It's very existence is frugal since it's the gritty bits of corn gleaned after grinding cornmeal. It's inexpensive and a little bit goes a long way. But, as we all know, it's not a bargain if no one will eat it.
So, today, I'm making fried grits. If they work out, are tasty and my family likes them, I'll add the recipe later.
I'm still experimenting with apple fritter recipes. We made a batch yesterday and they were good... but not what I was looking for, so the search continues and I still have supplies on hand!
As I was digging through the freezer, I also discovered a bag of wheat berries. I'm not sure where they came from either, but now I'm intrigued and searching for recipes. I've no idea as to their cost, so I don't know if I can recommend them as a frugal menu item... but I'll check into it. Because, if I like them, I'll want to add more of them to my larder.
It seems I have a busy week experimenting in the kitchen with new ingredients and recipes!
Monday, February 11, 2008
The Mormon Way
When I was a child a couple of our neighboring farmers were devout mormons. They shared a few tenets of their faith with us when we were around their farms. Most of them made sense and seemed in anyone's best interest to take them to heart. It's hard to argue with treating your body as a temple and not polluting it. It's even harder to argue with their teachings on food storage and emergency preparedness.
The mormon faith teaches followers to be self-reliant. They are instructed to be responsible for themselves, their family and their church... in that order. A very big part of this is food storage and emergency preparedness. Each mormon family should have at least a two-week supply of food for every person and a year supply is even better, according to Church recommendations. This is good advice for everyone, regardless of their faith. As is the advice to develop a family emergency plan and 72-hour emergency kit.
It seems a rather daunting and expensive task, building up that much of a larder. But, a two-week supply is not that difficult to obtain. The first step in the task is to consider what meals you would likely cook and to list ingredients - making sure you have enough of the things your family will actually eat on hand. The second step is to consider your means of storage and the uses for your supplies. After purchasing begins, another important step in this process is to rotate the stock. Food doesn't last forever, so occasionally one must eat what is in storage and replace it with fresh items.
A basic food larder should contain some legumes, grains, powdered milk, water, cooking oil, and dried fruits. It is helpful when you grow a garden and preserve your own produce. Whether you can or dry the food, make sure it is in a form you will eat. And, try not to rely too much upon your freezer. In the case of a disaster, you will not likely have power and your generator may not run long enough.
As for emergency preparedness, this goes a step beyond just securing and storing food for your family. A 72-hour kit with enough food and water for the family, flashlights, blankets and items in the event of an evacuation is the central piece for emergency preparedness. But, so is the family plan and the discussion that goes along with it. If you were evacuated, where would you all meet up? What if cell phones didn't work? These are all important considerations that will save your family stress during a crisis.
What kind of crisis? It could be any kind. We all witnessed what happened to millions who were unprepared when Katrina hit. And, in my own backyard, so to speak, we received a poignant reminder in the form of a tornado. Cell towers were out for some time following the sudden storm. Power was out for several days for thousands who suffered no other damage.
The LDS (mormon) Church has several books printed on the topics of food storage and emergency preparedness. They have been considered the Gentle Survivors by many for several years. It was even a running joke in our family for a long time that if there was a big disaster, we should all head over to our mormon neighbors because we knew they were well-stocked. Rather than rely on them, however, we just adopted The Mormon Way into our lifestyle. My pantry always has at least a two-week supply... if not closer to a month. And, I have emergency supplies including flashlights, lanterns and basic camping supplies. I'm not quite as organized about my storage as most mormons I know, but then again... I haven't attended their classes on the topic.
We should all take a lesson from their teachings and work to be more self-reliant. In the event of a natural disaster, a man-made disaster, or an unemployment disaster... if you have food storage and an emergency plan you can ensure your family's security.
Sunday, February 10, 2008
Apple Fritters and Conversation
We were invited to a dear friend's house to enjoy hot, fresh apple fritters and visit. He, his wife and young son were in town visiting his mom. His mom fried the apple fritters while we chatted. She apologized for not having the exact recipe she used when the boys were in high school and played games at her house. No apology was necessary. They were delicious.
She is older than our parents. Our friend was a "late-in-life surprise" baby... twin actually. She came here from Germany where she worked as a seamstress in fashion houses before the war. During the war, she just worked to survive, from what she said. I'm not sure about the dates, but I don't think she was able to move here until after the war. Our conversation turned at one point to her amazing skills both in the kitchen and at the sewing machine.
She related that during wartime in Germany, what she witnessed was the wealthy people had the most difficult time surviving. They did not have their own cow, they bought their milk... same with eggs and other items. When these items were in short supply, the wealthy folks did without. They did not know how to perform basic survival skills and had long relied on others to help them. When their money lost its value, they could no longer hire help to cook their meals or to women wash their laundry. She cautioned against our modern world to a certain extent, saying that we should all know enough simply to survive.
She is right.
Something I've heard my entire life, growing up in the Ozarks money-poor and land rich, was, "by golley, I can always take care of me and mine living off my land." And for the most part that was true when I was younger. Most everyone had at least a handful of chickens, a milk goat or cow and a patch of land big enough for a garden. That's not so much the case now.
Other than complain about high prices, I don't really see folks doing much about their situation. I don't see them making lifestyle changes to enhance their survival during lean times. Maybe they don't feel the need. Perhaps they are so sure of America's ability to bounce back that they aren't concerned. Perhaps they don't remember what it's like to do without... or they never really knew.
It's unfortunate that it's not just an easily defined group such as "the wealthy" who will have difficulty surviving should our country's economic woes last very long. Amazingly few know how to cook, unless it comes from the freezer section. And, that's just the most basic of survival skills.
It's frightening. But, I don't think most folks are aware enough to be frightened. They could make some very simple lifestyle changes and find themselves a lot more secure.
Mull it over while munching on Apple Fritters. This is pretty close to the apple fritter recipe our friend's mom used.
Old-Fashioned Apple Fritters
1 cup sifted all-purpose flour
1 1/2 teaspoons baking powder
1/4 cup sugar
1 teaspoon salt
1 egg, beaten
1/3 cup milk
1 tablespoon melted shortening
2 large apples
oil for deep frying
Sift together flour, baking powder, sugar, and salt. Combine egg and milk; add to flour mixture; beat until smooth. Add shortening and mix well. Peel and core apples; cut into 8 wedges. Dip apple wedges into batter and fry in 370° oil for about 4 minutes, or until brown.
I've since found a few others I think I will try out and post about later! They certainly were delicious and seemingly simple.
Saturday, February 9, 2008
Twisters and Life
Well, the tornadoes that are making headlines hit our small area. My family and I are safe. Our property is unscathed. But, the little community just a few miles from our home is devastated. As are several other small communities in our area.
During this time, the people have come together and reached out to one another. Local agencies have had to ask people to stop donating until they can organize the stuff they've already received. Volunteers have been asked to register their services at one location and wait to be called to help out. The response has been overwhelming.
My thoughts of late aren't on frugal living so much as community spirit. I've been fortunate, as a small town girl, to witness the amazing things a strong community can do several times in my life. From the time we rebuilt the bell tower at the local historic school house in my tiny community to the first tornado cleanup I experienced as a teenager in the 80's I have many memories of everyone stopping what they were doing and coming together for the greater good.
Often the women would cook and wrangle the kids. They'd make sure that there was plenty to eat and drink for all the workers and that the little ones didn't "get under foot" during the work. They'd help out where they could, but mostly it was the men and youth that did the bulk of the labor. Since I was a youth, perhaps it was mostly the men that did the bulk of it... but we certainly felt like we were making an important contribution to the efforts. If I couldn't run a chainsaw, I could certainly haul limbs to the burn piles... or run glasses of ice cold tea and lemonade to the guys.
This spirit is alive and well today. I had occasion to drive through one of the communities that suffered in this disaster. The hospital was hit very hard but fortunately only a few homes and businesses were really effected directly. However, the entire town area was without power. So, there were grills set up in the parking lot of the local grocery store and they were cooking the meat before it spoiled and passing it out to all takers. All along the road I saw grill after grill of volunteers cooking meals for the entire town... they were all sharing. They were making sure the volunteers for the cleanup were fed, but they were also taking meals to the elderly and to their neighbors without power.
This was very heartwarming to witness. It is unfortunate that it sometimes takes a crisis to remind us to slow down and look out for one another. With the strength of community we can accomplish amazing things and without it we are left alone. No one should be alone.
Tuesday, February 5, 2008
Kill-A-Watt
My daughter's college is having a contest among the dorms to see which dorm can reduce their energy usage the most. The program is called Kill-A-Watt. The dorm that wins the contest (lasts from February - April) is given the amount of money they save to spend as they choose. We started our own Kill-A-Watt program in our home this winter after seeing our November electric bill. While our usage had not really increased terribly, the rates had. And, it was time to seriously address the amount of energy we use in our home on a daily basis.
We began with an awareness campaign... my daughters called it nagging. Turn off anything you aren't using. Unplug anything you won't be using for a while.
It worked. We reduced our usage by 1,000 kW for the month of December. That was 1,000 kW less than the previous month's usage and almost 1,000 kW less than the same period one year ago... although this year the average daily temperature was 10 degrees colder.
One big factor was our supplementing our central heating source with a fire in our wood stove. This helped significantly. But, the other steps we took were not insignificant. We often discount how much energy that forgotten lamp is drawing or that those appliances that aren't in use but are plugged in are constantly pulling watts from the energy lines. Simply going as unplugged as possible adds up to several watts saved.
Of course there are several things one can do to reduce their energy usage including purchasing energy efficient appliances and reducing heat or A/C loss through caulking and sealing areas in the home. One can even use solar collectors or passive solar to heat spaces.
Then, there are the little things, several of which I've mentioned here and there in this blog. They include using the oven when it's cold outside and then when you're finished opening the door to let the heat in the room. Not using the drying cycle on the dishwasher, but again, opening the door and allowing the heat and moisture (winter is dry) into the room. Not using the dishwasher and handwashing dishes (gasp!) can save energy.
My oldest daughter suggested we hang-dry jeans and other items that take longer to dry... something she picked up from not wanting to spend more quarters in the dorm laundromat. This has the added frugal bonus of helping our clothes to last longer. A simple rack can be made or purchased from Linens-N-Things which makes hanging your clothes inside a simple, organized task.
Presenting energy savings as a Kill-A-Watt challenge can be fun and spark creativity. I was surprised at how my family has responded to our call for energy reduction at home. But, I'm even more surprised and inspired by what's happening at my daughter's college. These young women are really working to reduce their energy usage and I'll be interested to hear some of their creative methods for achieving their goals.
Monday, February 4, 2008
Quiche - Quick, Simple, Inexpensive
Everyone in my family enjoys quiche, especially my husband; thus shattering the stereotype that "Real Men Don't Eat Quiche". Anyone who knows my husband would certainly say he's a real man. A burly, strong lumberjack of a guy who can wield an axe and grow some of the best tomatoes you've ever eaten in the garden he works with his own hands... but, I digress. Quiche is a wonderful entree to add to your menu. You can serve it for breakfast, brunch, lunch or dinner. It is filling, versatile, quick, simple and easy on the budget.
I was reading quiche recipes today when I realized I hadn't served this lovely dish since Christmas brunch. I usually make quiche when my chickens are laying eggs in abundance. Even if you have to buy eggs, quiche is still an inexpensive entree. If you serve it with a salad, you have a wonderfully balanced meal. I like to serve it frequently in the spring when fresh ingredients for the quiche and salad are abundant, but it's great any time!
Here's the basic recipe I use:
Basic Quiche
1 prebaked pie shell (I make my own crust... recipe follows)
1 teaspoon dijon mustard
3 large eggs
1 cup cream (light cream, heavy cream, half-and-half are all acceptable)
1/4 teaspoon salt
Pinch of black pepper
Pinch of ground nutmeg
Lightly brush the pie shell with mustard. Whisk together eggs, cream and seasoning. Pour mixture into pie shell, place on cookie sheet and bake at 350 until slightly puffy and a knife inserted in the center comes out clean. 30 - 40 minutes. Let cool about 15 minutes prior to serving.
While the quiche is baking, you can prep your salad to serve with it!
Here are some other family favorites, but remember to feel free to create your own.
Classic Quiche Lorraine
Cook 8 slices bacon in skillet until brown and crisp. Saute 1/2 chopped onion in the bacon grease until soft. Place 1 cup shredded swiss cheese in pie shell, add bacon and onion, top with egg mixture, sprinkle top with 2 - 3 tablespoons shredded swiss cheese.
Broccoli Quiche
Microwave 1 cup broccoli florets until tender (2 - 3 minutes). Coarsely chop and arrange in pie shell. Saute 1/2 chopped onioin and 1 minced garlic clove in 1 tablespoon olive oil until soft. Scatter over broccoli. Sprinkle with 1/2 cup cheddar cheese. Pour in egg mixture, sprinkle with paprika.
Bacon & Spinach Quiche
Cook 4 slices bacon in skillet until brown and crisp. Saute 1/4 chopped onion in the bacon grease until soft, add 1/2 cup frozen or 1 cup fresh spinach and cook until spinach is heated or wilted respectively. Place 1/2 cup shredded swiss cheese in pie shell, add bacon, spinach and onion, top with egg mixture, sprinkle top with 2 - 3 tablespoons shredded swiss cheese.
Ham & Cheese Quiche
Place 1 cup shredded cheddar cheese and 1 cup chopped ham in pie shell, top with egg mixture.
Pie Crust
2 cups flour
1 cup vegetable shortening
1 teaspoon salt
½ cup ice water…approximately.
This will make 23- 9” pie crusts. Put flour and salt in a medium mixing bowl. Add shortening or shortening and lard mix. Use a pastry blender or fork and cut the shortening into pieces that are no smaller than large peas. The larger pieces the better. Add ice water a little at a time and mix. You want the dough to just stick together, not be too moist. The dough should not be sticky at all. Round the dough in a ball. Try not to handle the dough more than absolutely necessary. Keeping the shortening in pieces is what makes the crust flaky. Wrap the rounded dough in plastic wrap or put in a ziplock bag. Put in refrigerator for at least an hour. This will allow the water to be uniformly absorbed and let the dough rest. Take out and divide into 2 equal pieces. Roll out dough on floured surface. Roll away from you , turn dough, roll away from you and turn dough, all the while, working it into a round. Use a pie pan to determine that you have the right size. It should be a couple of inches larger than the pan. Fold the dough over your rolling pin and place in the pie pan. For a baked pie shell, prick the dough with a fork all over the bottom and sides to keep it from bubbling up, cover with foil and fill with beans or pie weights. Bake in pre-heated oven at 425.
Wednesday, January 30, 2008
Frugal College Life
My oldest daughter is a fresh(wo)man in college and my youngest daughter was just notified of her acceptance to the college of her choice. I'm very pleased that both of my girls have received substantial scholarships for merit and financial need. They've also benefited from the wonderful gift of a 529 plan from their grandmother. This combination of funding has reduced my burden tremendously. But, there are still expenses involved that I must cover (books, supplies, the remainder of the room & board not covered by the above listed aid) and this leaves my budget tight. I have told the girls that their tuition, room, board and books are covered, but anything else, they must provide. This has led to some creative strategies by my oldest daughter.
She does not have a car at college. She doesn't really need one, except to make the trip home. She uses the bus system to get around town but most of what she needs is within walking distance of her dorm. She also rides with other students as they make trips to the mall or other shops for groceries and supplies. This saves the gas money, insurance, parking permit fee, and hassle of maintaining a vehicle.
She obtained a really great job, working in the nursery of a church just a few blocks from her dorm. The church has taken her in and treats her very well. She works for a few hours on Sunday morning and Wednesday night, no conflict with her school schedule at all. The pay is good enough that she is able to get the spending money she needs from this. The church members have asked her to do some private babysitting and even work as a server for a catering job. These extra jobs are great because they give her the flexibility of looking at her schedule to decide if she can do them and, if so, provide her some extra income. The added bonus is that she's networking and creating her own friendships and sense of community beyond the college environment.
On weekends, the cafeteria at the school only serves brunch. Because of this, I send my daughter supplies to make her own meals and she buys fresh ingredients locally. I've taught her how to cook and she does very well. Following Christmas break, I sent her a cooler with some tilapia, salmon and other frozen items for her to enjoy on her weekends. This past weekend, she was cooking in the dorm kitchen (which is located across the hall from the head RA for the dorm) and visiting with the RA. When asked what she was cooking for dinner, my daughter rattled off her menu, "Pan-seared salmon with mango-chipotle chutney, wild rice and baked sweet potatoes." (Yes, the mom here is saying, "where's the green veggies?"... but hey, it's not pizza!) To which the RA responded in some sort of awe, according to my daughter. Then, my daughter expressed that she felt sorry for the kids she saw heating up Easy Mac in the microwave and those who obviously hadn't a clue how to cook. From this conversation was borne the idea (and permission) for her to cook meals on Saturday and Sunday and sell the plates first-come, first-served to any takers. She posts her menu in the lobby, with a sign-up sheet for planning purposes. She charges $5 or less (depending upon the menu) for a plate. I think this is fabulous, and as I told her, if she only gets enough to pay for the groceries/supplies, then she's still ahead because she's basically eating for free. If she makes a little money, great!
There are other opportunities to save or make money. You'd be surprised how many kids don't know how to do laundry. Some have become so frustrated that they take theirs to the local "Wash-n-Fold" place. For someone who doesn't mind doing laundry (not my daughters) there is the potential to take over some of the Wash-n-Fold business by taking in dorm mates laundry and doing it at the laundromat when doing their own.
If you want to save some money, make sure your young adult knows some very basic living skills before they jump out of the nest. Learning to cook, do one's laundry, maintain a vehicle and network are key skills that will save them (and you) money.
Additionally, teach them things about living frugally. For example, don't buy your supplies at the campus bookstore. A trip to Wal-Mart, Target, Michaels, Hobby Lobby, Best Buy or several other places provide notebooks, art supplies, calculators, etc at a price far less than available in the bookstore. Always check online to see if you can buy your textbooks cheaper (use ISBN number). There are several excellent online sites that sell college texts. And, likewise, check online before selling your book back to the bookstore. If the school offers you $3 for the book you paid $30 for a few months before, then do like my daughter did and offer to sell it to someone taking the class the next semester or next year. She got $15 out of it, which was win-win for her and the student who needed the book. Also, apply this technique to books you need for a class; ask around, someone may have them in their room. This is where networking with classmates pays off. Finally, don't rush to buy every book on the syllabus. They should be available in the library and some will not be needed until later in the semester and some are not needed at all.
While obtaining a college education is a costly endeavor, it can be made more affordable with a frugal mindset.
Tuesday, January 29, 2008
Chocolate Prices on the Rise!
Reading today's headlines I learned that Hershey's will be increasing the wholesale price of their chocolate bars 13%, effective immediately. They cite the rise in fuel, energy and commodities (milk) as the reason for the price increase. This is without a doubt a justified increase. But, it's bad news for chocoholics like me.
There are several ways to satisfy the chocolate cravings. One of my favorites is with Chocolate No-Bake Cookies. Because of their peanut butter and oatmeal contents, I like to think of them as somewhat healthy. Another is homemade fudge... and not the chocolate chip and marshmallow cream kind.
The key ingredient here is cocoa. This is one item I strongly recommend you don't buy the generic brand or an off-brand, unless you can test them in a small quantity first. I've tried buying the generic brands in the past and found that there was a definite difference in color, texture and most importantly flavor. Cocoa is a bit spendy, but a little goes a long way in recipes.
When I was a child, it was a rare treat to get an actual chocolate bar of any sort. A Hershey's bar was carefully eaten and savored one rectangle at a time. Mom made a lot of treats for us with cocoa, including cakes with a lovely cocoa buttercream frosting and fudge. On the news of the price-hike for chocolate, I've begun to prowl through some of the old church and community cookbooks I have from the 1950's and 60's. They have a lot of good recipes for cocoa based sweets.
In the meantime, I believe I'll whip up a batch of Chocolate No-Bake Cookies today.
Chocolate No-Bake Cookies
2 cups sugar
1/3 cup cocoa
½ cup butter
½ cup milk
Combine in saucepan and bring to a boil for 1 minute, stirring constantly. Remove from heat and Add:
½ cup peanut butter
1 tspn vanilla
3 cups raw oats
Drop by rounded teaspoonful on wax paper.
Friday, January 25, 2008
It's the Little Things
Little things add up. Keep a jar and toss your change in it every day, when the jar is full... start another one. This is a pretty obvious way to see that little things add up. Others aren't quite so glaringly obvious.
Do you review your monthly bills? Most people don't really look at them too much. They scan over them and pay the amount requested. However, bills need to be reviewed for accuracy. Do you really want to pay the phone company extra each month for services you aren't using? Remove the line maintenance fee! It's like buying an extended warranty. Check for other fees.
I have two phone lines, for one I was being charged a rate for having touch-tone, the other I wasn't. All my phones are touch-tone... why was I being charged for one and not the other? I asked for the charge to be removed. I'd requested bundle billing with my dsl, phone service and unlimited long distance. This was to save me some money each month. A review of my bill after requesting the bundle, showed that they didn't bundle it. Another phone call.
It can be frustrating to deal with these things and that's why I'm sure most folks would rather not. But, think of that change jar. If your utilities are hitting you for $1 here or $3 there in extra charges, it doesn't take very long for that to add up. Double check your meter readings... I've had them reported incorrectly. Take a good look at that bank statement, I've had the bank erroneously enter a $10 check from my account as a $100 check. That was a messy error. All of these entities rely on a combination of humans and computers... mistakes do happen.
So, take the time to really look over your bills and note any changes. If necessary, prepare to approach the entity regarding the error. Remain calm. It's not the person on the other end of the phone line's fault that an error was made and they aren't personally profiting from the mistake. Remain vigilant. It may take several attempts to correct the problem. If you keep decent records though, it should all work out in your favor.
Monday, January 21, 2008
Potluck Dinners
My daughter had to take something for a potluck lunch at school today. As I was helping her to prepare her dish, we discussed what other kids were bringing. She commented to me that a number of the kids didn't know what a potluck meal was. I dropped my spoon. How is that possible?
Potlucks are a great custom. I don't know if it's a regional thing or if it's a small-town thing. I just know that they've been a big part of my entire life. As a child, I recall potlucks at church after services, family potluck gatherings, club potluck gatherings, community potluck gatherings. And, as an adult, most of these continued and even included potluck meals at work.
At one place I worked we had a weekly mid-week potluck. Employees could either bring something or they could donate a $1 to our employee benevolence fund and just grab a plate. At another place we held a potluck once a month for fellowship. When I was a younger, single, working mom my co-workers and I decided to do potluck with a twist. We took turns cooking lunch and bringing it for everyone in the group. You only had to bring something one day a week and the rest of the week, enjoy everyone else's cooking. This helped all of our budgets.
In fact, potlucks are a great budget stretcher for families. I lived in a friendly neighborhood as a young mom and we often held neighborhood potlucks to stretch our budgets. It's a fantastic way to get to know your neighbors and create connections.
Today I sent Cranberry Meatballs for the school meal. The teens always love this and I think it's pretty good... and simple. As far as potluck dishes go, it's not too spendy. When I was at the store, I calculated that the cost was going to be about the same whether I bought the ground meat and made them myself or if I just bought them prepared. So, for time savings (also a part of being frugal) I opted for the prepared meatballs.
Cranberry Meatballs
1 can cranberry sauce
1 jar chili sauce
80 count bag of meatballs (2 1/2 pounds prepared, cooked meatballs)
Place cranberry sauce and chili sauce in sauce pan and heat until cranberry sauce has melted. Place meatballs in crockpot. Cover with sauce. Turn on high, stirring occasionally for 1 hour. Switch to low and cook for 2 - 3 hours, stirring occasionally. Serves up to 20.
Sunday, January 20, 2008
Conserving Gasoline
The jokes about needing to take out a loan to fill the gas tank are losing their humor as gas prices climb and remain high. This necessity is taking a larger chunk out of the family budget and for most of us, our income has not increased to meet the added expense. So, what do we do? We have to conserve.
For my family this has meant some simple but cost-saving efforts. We've calculated that every time we have to go to town (we live about 7 miles outside of our small town area) it costs us anywhere from $4 - $10. This realization helped everyone to make the most of each trip. My daughter is in town daily because she has swim team and dance practices after school during the week. It is more economical to let her drive than it is to drive back and forth to run her around. If she has time between activities, she spends it hanging out in the coffee shop, bookstore or a friend's house rather than driving home and going back in.
We keep a running list of errands and items we need from town. If it's something that can wait, it waits. If it's something we need urgently, we have our daughter pick it up for us while she's in town. Or, alternately, we have our neighbors pick it up for us when they are in town. Our immediate neighbors and us have all begun to communicate with each other before we go in. If I just need a gallon of milk, they'll gladly pick it up while doing their own shopping or running errands. And, I do the same for them. We conserve our trips.
When we need to run errands, I make out the route that is the most efficient use of time and gas. I list the stops in the order in which I need to make them. We also ride-share with our neighbors for some of these errands whenever possible. There's no sense in all of us driving in and going to the same places or nearby.
We're having more of our bills direct-drafted from our banking account so that we don't have to spend $.43 on a stamp or $1.00 driving it to the office. We use the online postal service to purchase stamps and mail packages, saving us trips to the post office whenever possible (although, at times it's confusing and we still have to go in).
Those are all pretty simple, conserve-your-trips-to-town steps we've taken. But, we are stepping out further. I recently read an article on "hypermiling" and have begun to apply the principles to my driving. I'm teaching my daughter as well. It's really very simple steps you can take to conserve even more fuel:
1.) Record your gas mileage at each fill-up and track it. Awareness is a good thing, plus you can track your improvement.
2.) Don't drive aggressively. Leave a space buffer between you and the car in front of you. This will allow you to coast more and apply your brakes less. The more you speed up and then hit your brakes, the more gas you are wasting.
3.) Minimize your time stopped at red lights. Again, don't accelerate up to them and then hit your brakes. Coast in to them, letting the vehicle slow down before you hit the brakes. If you're in stop and go traffic, just coast as much as possible instead of accelerating.
4.) Start slowly from a stop. If you drive an automatic, pause for a second after you take your foot off of the brake pedal and move to the gas pedal. Most automatics will start moving forward on their own, slowly. This saves fuel as it takes more energy to place an object at rest in motion than to accelerate a moving object. No jack-rabbit starts!
5.) Use your cruise control to accelerate. This way, you can accelerate in measured increments and not have to hit the brakes because you over-estimated how hard to press the pedal for your acceleration needs.
6.) Keep your car in good repair and well maintained. Check the air pressure in your tires and make sure they are all the same (I've seen this have a pretty decent impact on my mileage). Keep your filters clean, air, fuel, and oil. Keep your car tuned up. When my car was properly tuned up, we increased our mileage by 4 mpg.
We live in a hilly area, so the easiest thing for us to do is coast more! There are also some adaptations one can make to their vehicles, but this is all a little too mechanical/techie for me.
For now, we'll just stick with conserving our use of our vehicles and hypermiling. Every penny saved is helpful.
Friday, January 18, 2008
The Bargain Store
Yesterday I went shopping. It was time to stock up on some staples. And, after writing about the bulk chicken, I was craving barbecue chicken sandwiches. I did grab a bag of chicken quarters and tossed them into the crockpot last night. I make a habit of beginning my grocery shopping at our local bargain store. I think they are popping up in towns everywhere. They are stores that buy the dented boxes of cereal, the overstock food before it expires, etc.
I'm able to stretch my budget and have some "luxury" foods through my strategic use of the bargain store. Since I never really know what I will find there, it helps to start my shopping there and then go to the other store. Sometimes my cart is overloaded and other times I only have a few items. Yesterday it was overloaded.
My youngest daughter is a senior in high school and captain of the swim team. As the captain's mom, I'm to provide swim team snacks for some of the meets. When trying to find healthy snacks for 25 swimmers, it can get costly. But, yesterday, I hit the jackpot at the bargain store. They had an overstock of Planter's Honey Roasted Peanuts individual 5 oz. bags 5 for $1.00, rather than $1.59 each. I also found that some of their fruit snacks were not only inexpensive, but because they had such an inventory they'd also marked them 2 for 1! I managed to get individual bags of apple chips, the honey roasted peanuts, propel powder and yogo rollers, a total of 30 individual servings of each, for about $13. Oh yeah!!!
My oldest daughter is in her freshman year of college. She lives in the dorms and has the meal plan, but this only provides brunch on the weekends... and no late night snacks. They have a decent kitchen in the dorm and she knows how to cook. So, I was on the lookout for stuff to send her. She loves asian food (actually the whole family does). When looking for ethnic foods and healthy foods, I often get lucky at the bargain store. It seems they just aren't that popular here in the Ozarks. I picked up some Simply Asia Thai meals for $1.29 each, some Far East Couscous for $.50 a box and some other miscellaneous items. She'll be happy when she receives this care package!
You do have to shop wisely at the bargain store. Look at the expiration dates and have a good idea what's okay if it's expired and what's not... and what's a reasonable time frame after the expiration date. For example, the 1 lb bag of Archway ginger snaps I picked for $1.29 had expired in mid-December. I'm eating them right now and they are fine. But I passed on the 6-months-past-expiration-date pancake mix... I don't like to find bugs in my flour products and weevils seem to thrive here. It just wasn't worth the risk. Although, the local bargain store will accept returns with a receipt should you find such a disappointment.
It's worth the effort to shop there. I find little treats and rewards I wouldn't otherwise purchase. Tonight I'll enjoy a bowl of Ben and Jerry's Vermonty Python ice cream (a pint for $1.19!) and I won't even care that the container has a dent at the bottom!
Thursday, January 17, 2008
Bulk Meat Saves Time and $
You know those big bags of chicken leg quarters sold inexpensively at the store? It's a 10 lb bag for about $5. Most people skip past them unless they are hosting a barbecue or have a huge family. I think they are overwhelmed by the size. Some frugal folks do purchase them and then repackage them in appropriate portions for their families and freeze them. But, what else can you do with these bulk bags?
Well, I discovered a few years ago a very nifty way to use them. I place as many as will fit into my crockpot, put the lid on and turn it to the "high" setting. I don't season them at this point... though you could salt and pepper them. I leave them to cook for several hours, until the meat is falling off of the bones. I drain the juice and fat into a container and debone the chicken. The juice and fat can be used to make chicken stock and frozen or poured over dog food (especially in the winter when they need extra fat).
The deboned chicken is then packaged. Some goes into vacuum sealed bags and into the freezer for later use and some goes into the fridge for immediate use. I use the pre-cooked chicken in a number of ways:
- Add barbecue sauce and make barbecue chicken sandwiches
- Place with cheese between two tortillas and grill for chicken quesadillas
- Use for chicken salad
- Use in recipes such as chicken enchilada casserole
The same concept can be applied to bulk ground beef. Simply brown the ground beef, drain the fat and juices (I pour it over the dogs' food) and repackage it. Then it's available for many recipes as well:
- One-dish-meal
- Spanish Rice
- Sloppy Joes
- Taco's (I like to go ahead and season some for tacos and label the package accordingly)
For just a few dollars, I've got the base for several meals and I've saved myself time. It's great for those days when we have a lot going on and want to grab something quick.
Wednesday, January 16, 2008
T.V. Free
We don't watch regular t.v. in our home. It's not that we're morally opposed to it or anything like that. Although, there really doesn't seem to be much of value to watch.
We chose to disconnect our satellite service about 4 years ago. The monthly bill had doubled since we had elected the service. The cost seemed to be ever-increasing. It was difficult to justify almost $70 per month for t.v.
Without satellite, we don't have t.v. We are too remote for cable service and too far in a valley for decent antenna reception.
This was not the first time we had gone without t.v. I was unable to afford a satellite hookup for some time and we did without when we first moved into our home. In fact, I think we've only had t.v. for about 9 of my oldest daughter's 19 years... and 6 of those years were when we lived in the city and had cable.
We do have 3 television sets and we have dvd players for each of them. We rent dvds regularly and have found the most convenient and economical method is using Netflix. I love seeing those red envelopes in the mail! I love not paying late fees! And, I'm still paying less than half of what I did for satellite.
The brilliant part for us has been that we are not slaves to t.v. programming. Yes, I know tivo has helped resolve some of this issue. But, living t.v. free is even better. We don't have commercials, stupid repetitious news stories and other drivel pouring into our daily lives cluttering our minds. We choose what we watch and when we watch it.
I will admit that when I first gave up t.v. I suffered withdrawals. What to do with the extra time? What to do with the quiet? Well, I quickly filled the void. Then, I became aware of how much our culture revolves around t.v. I was in the dark when folks would discuss what they saw on t.v. the night before or the latest scandal. Soon, I found that I was rather blissfully unaware!
I keep up with current events through news on the internet. I watch t.v. programs I find interesting when they are available on DVD.
What have I gained? I save money. I have more time. I've spent valuable time with my kids as they've grown up doing homework, cooking, playing games, talking, reading, etc.
For us, removing the t.v. from our lives was a very positive step. So, try it for a few days. Turn off the t.v. and go t.v. free. See if it makes a difference for you and your family. You might be surprised!
Tuesday, January 15, 2008
Dog Biscuits
Buffy ran out of dog treats. She's been training well with the delicious incentive.
So, I went online and looked for dog treat recipes. I found one called Flea Hater's Biscuits. I had all of the ingredients on hand, so I mixed up a batch.
She hated them.
Wouldn't even taste them.
Hmmm... Well, I decided to use some venison we'd been given for a nice Venison Chili. When I drained off the fat and juice from browning the ground venison, I poured it over the failed dog biscuits. I popped them back into the oven to toast and brown.
She likes them! I saved $3 on dog biscuits by using staples in my pantry: flour, oil, wheat germ, brewers yeast (I just happened to have received a small bottle in recent weeks), salt and chicken broth (I used my stock of buillon powder).
I'm not sure how to tell if a dog treat recipe will taste good to a dog or not, as yet. But, there a lot of them available on the internet to try. They're pretty simple and it's fun.
Monday, January 14, 2008
Cookbooks & Sweet Potato Pie
I love cookbooks. I have a bookshelf full of them and room for more. Most of them have been gifted to me over the years. The first ones I received when I was 16. My grandmother was terminally ill with cancer. We had enjoyed cooking together over the years. She called me over to her bed and told me she wanted me to have her Woman's Day Encyclopedia of Cookery volumes (circa 1966). I cherish those books.
From there, I've received other books from family and friends who know my joy of cooking. The interesting thing to me about receiving these as a gift, is they represent what that person knows of you... and it's somewhat intimate when a person knows what you like to eat and cook. It is somewhat nurturing when they want to somehow share that with you. Maybe I make too much of it.
But, when I look at my cookbook collection, I smile when I see the 4 Ingredient Cookbook gifted to me by a friend who knew when my life was busy and chaotic. As we worked to remodel and build an addition on our house, this cookbook allowed my young daughters to easily prepare meals for their tired, bedraggled parents. Or when I see The Vegetarian Grill, gifted to me by my brother and sister-in-law who know my husband's love for the garden and our enjoyment of eating veggies cooked in interesting new ways. A glance at The Trellis cookbook brings back memories of visits to that (one of my favorites) restaurant when I lived in Virginia. And, the church cookbook gifted to me by a family friend will always be treasured for her handwritten notes in the margins about the recipes.
Yesterday, as I was preparing to make sweet potato pies, I wanted to try something new. I looked first in my grandmother's cookbooks, my source for the most basic and time-honored recipes. Then, I pulled out Emeril's TV Dinners, a book I gifted my husband who loves Emeril. In those pages I found a recipe for Sweet Potato and Pecan Pie. I glanced back at my grandmother's cookbook. There was a recipe for Sweet Potato Pecan Pie. Hmmm... I compared the recipes. I decided to use the Emeril recipe with some minor adjustments based on the older recipe (sorry, Emeril). Fortunately, I still had a bag of pecans left from the holidays. So, we were in business.
My daughter and I began mixing and stirring. Funny thing, she doesn't really like to cook. But, she's quite good at it. We managed to make three pies from the leftovers of our holiday pantry stock. But, more importantly, we spent some valued time together and shared some giggles. I think of Like Water for Chocolate and wonder if the pies will bring smiles and giggles to those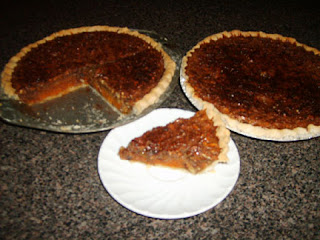 with whom we shared them. They should. I couldn't wait any longer and stole a piece while the pies were still cooling. As Emeril would say, "that's what I'm talkin' about!" It was incredible.
I carried a pie over to my brother and his family while it was still warm. I have half a pie each for my mom and my father-in-law. For just a few dollars, some valued time in the kitchen, and some giggles... I was able to spread the joy with others and let them know that I appreciate and love them.
If you like the Thanksgiving side dish of sweet potatoes with the pecan, brown sugar topping, then you will LOVE this. I'll not infringe upon Emeril's copyright. You can find the recipe here: http://www.emerils.com/recipes/by_name/sweet_potato_and_pecan_pie.html I altered it by using sugar instead of cane syrup, although I had about 2 1/2 pounds of sweet potatoes I only doubled the recipe and I used my mom's pie crust recipe instead of Emeril's. Also I mixed the pecans into the the egg and sugar mixture and poured it over the top. I didn't make the chocolate sauce nor did I top with whipped cream. (Sorry again, Emeril) Even so, it was wonderful. Really, very wonderful.
In the winter, I like to do my baking as the sun is setting or on the coldest of days. I like to have the heat from the oven help with heating the home. I also open the oven door to let the heat escape into the room after I've finished and the oven is cooling.
So, I went to bed smiling, proud of my accomplishment and very pleased with the results. Then, I thought of those who would enjoy my efforts and imagined them smiling broadly after they took their first bite. I slept pretty well after that.
From there, I've received other books from family and friends who know my joy of cooking. The interesting thing to me about receiving these as a gift, is they represent what that person knows of you... and it's somewhat intimate when a person knows what you like to eat and cook. It is somewhat nurturing when they want to somehow share that with you. Maybe I make too much of it.
But, when I look at my cookbook collection, I smile when I see the 4 Ingredient Cookbook gifted to me by a friend who knew when my life was busy and chaotic. As we worked to remodel and build an addition on our house, this cookbook allowed my young daughters to easily prepare meals for their tired, bedraggled parents. Or when I see The Vegetarian Grill, gifted to me by my brother and sister-in-law who know my husband's love for the garden and our enjoyment of eating veggies cooked in interesting new ways. A glance at The Trellis cookbook brings back memories of visits to that (one of my favorites) restaurant when I lived in Virginia. And, the church cookbook gifted to me by a family friend will always be treasured for her handwritten notes in the margins about the recipes.
Yesterday, as I was preparing to make sweet potato pies, I wanted to try something new. I looked first in my grandmother's cookbooks, my source for the most basic and time-honored recipes. Then, I pulled out Emeril's TV Dinners, a book I gifted my husband who loves Emeril. In those pages I found a recipe for Sweet Potato and Pecan Pie. I glanced back at my grandmother's cookbook. There was a recipe for Sweet Potato Pecan Pie. Hmmm... I compared the recipes. I decided to use the Emeril recipe with some minor adjustments based on the older recipe (sorry, Emeril). Fortunately, I still had a bag of pecans left from the holidays. So, we were in business.
My daughter and I began mixing and stirring. Funny thing, she doesn't really like to cook. But, she's quite good at it. We managed to make three pies from the leftovers of our holiday pantry stock. But, more importantly, we spent some valued time together and shared some giggles. I think of Like Water for Chocolate and wonder if the pies will bring smiles and giggles to those
 with whom we shared them. They should. I couldn't wait any longer and stole a piece while the pies were still cooling. As Emeril would say, "that's what I'm talkin' about!" It was incredible.
I carried a pie over to my brother and his family while it was still warm. I have half a pie each for my mom and my father-in-law. For just a few dollars, some valued time in the kitchen, and some giggles... I was able to spread the joy with others and let them know that I appreciate and love them.
If you like the Thanksgiving side dish of sweet potatoes with the pecan, brown sugar topping, then you will LOVE this. I'll not infringe upon Emeril's copyright. You can find the recipe here: http://www.emerils.com/recipes/by_name/sweet_potato_and_pecan_pie.html I altered it by using sugar instead of cane syrup, although I had about 2 1/2 pounds of sweet potatoes I only doubled the recipe and I used my mom's pie crust recipe instead of Emeril's. Also I mixed the pecans into the the egg and sugar mixture and poured it over the top. I didn't make the chocolate sauce nor did I top with whipped cream. (Sorry again, Emeril) Even so, it was wonderful. Really, very wonderful.
In the winter, I like to do my baking as the sun is setting or on the coldest of days. I like to have the heat from the oven help with heating the home. I also open the oven door to let the heat escape into the room after I've finished and the oven is cooling.
So, I went to bed smiling, proud of my accomplishment and very pleased with the results. Then, I thought of those who would enjoy my efforts and imagined them smiling broadly after they took their first bite. I slept pretty well after that.
Sunday, January 13, 2008
Staying Warm
My parents' house was heated solely with a wood burning fireplace when I was a child. I have many memories of coming inside on a cold winter day and standing in front of the fire to warm myself. We'd hang our wet socks and gloves all around the fireplace to dry before we went out again. There was nothing that could warm you when you were chilled to the bone, like standing in front of that crackling fire.
However, there were drawbacks to this method of heating. The further one was from the heat source, the colder the environment. On very cold winter nights, we would close off our bedrooms and sleep around the fireplace in the living room. One particularly cold winter, we hung a blanket over the entrance to our hallway in addition to closing all the doors and the family lived in the front portion of our home.
When I was in High School, they added a wood burning furnace. This allowed them to utilize wood as a fuel source and have the heat piped to each room of the house. Brilliant!
Though I live on the same land where I was raised, I'm in a different house. We are fortunate that we live on a fairly large plot of forested land. Trees are abundant. It only makes sense to utilize the fuel we have available in abundance. We prefer to harvest standing dead timbers. The live trees we cut are usually selected to improve the health of our forest. Overgrowth is not healthy. This is one of the many things my dad taught us about forestry management.
I chose not to utilize wood as my only fuel source for heat. Between the extra dust, ash, wood chips and having to cut, haul, split wood... I wanted something a bit more convenient. But, I also wanted to be practical. We have a wood burning stove in our living room in addition to an electric heat pump. We burn a fire on the really cold days and nights to reduce the efforts of our heat pump and reduce our electric bill. And, it's still really nice to come in from the cold and stand next to the fire to warm up. Oh, and if the power goes out (as it does when the ice is bad) we still have heat!
One winter we had ice so bad that we were isolated for 2 weeks. Our power was out for 5 days, we ran out of propane (our cooking fuel source) and the pipes froze. I became resourceful and recalled experiences from my youth. The wood stove became not only our source of heat, but also water and food. We are fortunate to have a creek in our backyard. Buckets of icy water were heated on the stove for sponge baths, brushing teeth, and cooking. Toilets were flushed with snow and ice melted down in pots on the stove. Stews were made on the stove. Potatoes were roasted among the coals. I'd forgotten how good potatoes roasted in the coals could taste.
Since I was reminded, I now bake my potatoes among the coals on cold days. Baking potatoes in the oven takes a long time (an hour or so) and uses a lot of fuel. If a fire is already burning, it is simple to toss the taters in the ashes and let them roast.
 I decided to do this yesterday. On my pantry prowl the other day, I noticed we had about a dozen sweet potatoes that were about to go bad. What does one do with so many sweet potatoes? Roast them! And then, use some for pie, some for bread, some to eat warm with butter.
That's what I did. I washed the taters, coated them in shortening, wrapped them in heavy duty aluminum foil and tossed them in the ashes of the fire. The taters that already had bad spots and would not roast well (about 4 of them) were peeled, the bad spots cut out, chopped and boiled. Now, boiling sweet potatoes is my least favorite method of preparation. They just don't have as much flavor. But, rather than waste them, I could boil them, mash them and use them in bread.
Roasted sweet potatoes have an incredible flavor. Slow roasting them among the ashes helps the sugars to carmelize and the flavors to reach their peak. I love to eat them warm with just a pat of butter. But, having so many, I decided to make sweet potato pie with those leftover after supper.
Today, I'll be baking in the kitchen!
Saturday, January 12, 2008
Making the Most of What you Have
I'm not so good at planning ahead when it comes to shopping and cooking. I tend to buy what is on sale in addition to what I need. Or, I'll buy the 10 lb. bag of potatoes when I only need a few at the time, because the 10lb. bag is actually cheaper than the 5 lb. bag or buying only a handful of potatoes. It's hard to pass up a good bargain.
The problem with this can be not using the food that was a bargain before it spoils. Then, it just becomes a silly waste of money. The extra potatoes from the huge sack are often forgotten until they are a little funky. We don't eat that many potatoes apparently.
To resolve this and make the most of my budget, I prowl through the fridge and pantry at least once a week (sometimes more often) and see what needs to be used. Yesterday, it was potatoes. I had about 1/2 - 1/3 of a 10 lb bag left that needed to be used before they found their way to the compost pile. In addition to potatoes, I found some celery, carrots and a bit of onion all left over from holiday cooking and still in good condition... for now.
Being a chilly day, it seemed perfect to make a big pot of potato soup. Yum! I'll include my recipe, but I have to say that soups are one of those things I don't really follow a recipe to create each time. Usually the first time I make something new I do follow a recipe. Then, after that, it becomes my own and I will adjust things here and there for what's on hand. That's what I did with the potato soup I made last night and it turned out wonderfully delicious!
Potato soup is a great budget stretching item. Potatoes are inexpensive. You can get enough to make a huge pot and feed a crowd for only a few dollars. It is very filling and can stretch a meal when served with sandwiches or as an appetizer. Personally, I like a steaming bowl with some crusty bread or rolls.
 Potato Soup
3 tablespoons butter
1 cup onion, chopped
2 cloves garlic, minced
2 tbspns flour
4 cups potatoes, peeled and cubed
2 cans chicken stock (or add chicken bullion cubes to water)
1 cup milk
Salt and pepper
I had about 3 times the amount of potatoes needed, so I used a bigger pot and adjusted the recipe. I used a bit of oil with the butter to stretch it. Melt butter in a large saucepan. Add onions and garlic, cooking until soft. I added 1 carrot, peeled and sliced and 1 stalk of celery, chopped to this recipe last night. If you add additional veggies like this, do so when you are sauteéing the onions and garlic. Add flour to make a roué, then add potatoes and chicken stock to barely cover the potatoes. I had on hand some chicken broth powder that we picked up inexpensively at the local bargain store. I used water and about 2 tablespoons of the powder. Cook, covered, until potatoes are tender (15 to 20 minutes), stirring frequently. Add milk and season to taste. Milk was in short supply last night, so I skipped the milk and added more water to the cooking process. The flour had thickened the broth nicely and I used my spoon to mash some of the potatoes to make it a bit thicker. It worked fine without having milk in the recipe. Heat until thickened and creamy.
This made a decent pot of soup and we have some leftover in the fridge. I took a picture of some in the pot so you could see how yummy it looked... too bad we still don't have smell-a-vision. Today I'll freeze some of the leftovers for another day.
Enjoy!
Friday, January 11, 2008
Fried Pies
Fried Pies are a tasty treat from my childhood. On cold winter days, mom would make them for us. We'd come in with our fingers red from the bitter cold after completing our daily chores and grab the warm treats. They warmed our hands and our bellies.
They are simple and inexpensive to make. I went browsing in our pantry this morning and spied a $1 box of dried apricots from the dollar store. Being a cold day, it seemed just right to make apricot fried pies today.
I begin by soaking the apricots in a small pan with about an inch of hot water over them. I let them soak for about 20 - 30 minutes. Then, I begin to boil them. As they cook down I add about a cup of warm water. I keep doing this until the apricots become soft and they cook down to a thick jam-like consistency. Add sugar, if the apricots are not sweet enough. I've heard a splash of bourbon is good too. Depending on the amount of apricots (my box was 5.5 oz), it can take an hour or longer to properly cook down the fruit. But, it's worth it! Be sure to stir occasionally to keep from scorching. Remove from heat and allow to cool thoroughly.
While the filling is cooling, prepare the pie crusts. I use my mom's tried and true recipe. But, the secret is not so much in the recipe but in the handling of the dough.

2 cups flour
2/3 cup shortening (Crisco!)
1 tspn salt
1 tbspn sugar
1/3 cup ice cold water (approx.)
Cut the shortening into the flour & salt using a pastry cutter (or a fork) until the flour dough makes pea sized lumps. Leave some lumps... this makes the dough flaky Add the ice water and mix dough quickly - don't stir it too much, you want to stir until just mixed and add water if you have too much flour not worked in. The dough should be stickier than normal pie crust dough but should be slightly less wet than biscuit dough consistency. Form dough into four dough balls. Wrap in plastic wrap and refrigerate the dough for at least 20 minutes, letting it rest. Then, roll dough ball into a circle on a floured surface to about 3/8 inch thickness. Don't overwork the dough or it will be tough, just a few pushes in each direction with the rolling pin (or wine bottle, clean broomstick handle).
Take the filling and place off-center in the middle of the circle. Fold 1/2 of the dough over and seal the edges with water and crimp with a fork. You will need to pick up the filled pie with a spatula or it will burst from the weight of the filling. Alternately, place the dough circle on waxed paper prior to filling and use the waxed paper to transfer the filled pie to the frying pan.
Now, you can either deep fry or pan fry in about an 1/2 inch of hot oil, turning over when the edges have browned. I believe the proper temp is about 360. Fry until golden brown. Drain on paper towels. You can mix powdered sugar and water or milk and drizzle over the top, dust with powdered sugar, dust with cinnamon sugar or eat plain. Makes 4 fairly large fried pies.
You can also use ready-made pie fillings and make all different flavors of fried pie treats!
Enjoy!
Subscribe to:
Posts (Atom)
